One Lens — One Month
Use One Lens for a Month — A Practice in Becoming Fluent
I ask students to try a small, but generous constraint: use a single lens for thirty days. It is a modest rule with disproportionate rewards. The discipline is not about gear’s austere demands; it is a way to train perception so the camera becomes an extension of your eye. When you refuse the convenience of changeable focal lengths, you begin to move differently: you walk with purpose, you anticipate framing, and you learn to crop live — to see, before you raise the camera, what will be inside the frame and what will be left outside it.
Before we go further, I want to be clear: this is not a photographic project. It is an exercise — a month‑long discipline meant to sharpen attention, deepen instinct, and teach you the grammar of a single angle of view and subject‑distance relationship. Think of it as a theme, a constraint, a practice in fluency — not a project with structure or intention.
I return to this exercise often because it teaches the photographer to trust their own attention — the foundation of any meaningful practice.
This practice is especially useful when you shoot blind, from the hip, or with the camera held low and unobtrusively. A single lens teaches you the exact angle of view that will become your visual grammar. Over a month you develop muscle memory for distance, scale, and rhythm. You learn to trust your feet more than your zoom, and your seeing becomes steadier, quieter, truer.
A Note for Photographers Working in Other Photographic Genres
Although this exercise grew out of street practice, it adapts effortlessly to almost any form of photography. The heart of the discipline is not the street itself — it is the act of learning a single angle of view so fluently that your camera becomes instinctive. Whether you work in landscapes, portraits, documentary, travel, architectural studies, or quiet personal work at home, the benefits remain the same.
A single lens for a month teaches you to slow down and to commit. You begin to understand distance and scale with a kind of bodily certainty. You learn how your chosen focal length interprets space: how it stretches, compresses, reveals, and withholds. Over time, this familiarity becomes a quiet confidence — a sense that you can walk into any situation and already know how your frame will behave.
For portrait photographers, this practice sharpens your ability to read proximity and comfort. You learn exactly how close you need to be to honour the person in front of you. For landscape photographers, it teaches you to compose with intention rather than abundance — to work with the land as it is, not as you wish it were. For travel photographers, it builds a steady rhythm of seeing: you stop chasing novelty and begin noticing the subtle, local gestures that make a place feel alive.
The constraint is simple, but the rewards are generous. By limiting your choices, you deepen your attention. You begin to move with purpose, to anticipate light, to recognise patterns, and to trust your instincts. The lens becomes a partner rather than an option. And when the month ends, you carry that fluency into every other part of your practice — a steadier eye, a calmer mind, and a clearer sense of what you want to say.
And although these benefits appear clearly in street practice, the deeper lessons of the month apply far beyond it.
Why the One‑Lens Month Works
Constraint clarifies. When you limit choice, attention sharpens. A single focal length forces you to solve compositional problems with movement and timing rather than with glass. You begin to notice the gestures you return to, the distances you favour, the light that feels like home. You also learn to visualise a scene as it develops — to imagine the edges of the frame as if you are cropping live. That skill alone changes how you move through the street: you stop reacting and start composing in motion.
The month is long enough to move past novelty and into habit. The first week feels awkward; the second week you begin to notice patterns; by the third and fourth weeks you start to see the subtle shifts in your instincts. Keep a contact sheet or a simple grid of thumbnails so you can watch that evolution. The evidence of learning is quiet but unmistakable.
Angle‑of‑View, Field‑of‑View, and Why They Matter
When we talk about how a lens “sees,” two related ideas often get blended together: angle‑of‑view and field‑of‑view. They are connected, but they are not the same — and understanding the difference will deepen your one‑lens month.
Angle‑of‑view is the lens’s inherent optical property. It describes how wide or narrow the lens looks onto the world — the slice of the scene it can capture. A 24mm lens has a wide angle‑of‑view; an 85mm lens has a narrow one. This angle does not change unless you change the lens or the sensor size.
Field‑of‑view, however, is what actually ends up inside your frame. It is the result of two things working together:
the angle‑of‑view of the lens
the distance between the camera and the subject
Move closer and the field‑of‑view tightens. Step back and it widens. The lens sets the angle; your feet set the field.
This is why distance matters as much as focal length. Two photographers can use the same lens and make entirely different pictures simply because one stands a metre closer. And two photographers can make similar compositions with different lenses if they adjust their distance accordingly — though the perspective will never be identical.
Perspective — the spatial relationship between elements — is determined by where you stand, not by the lens itself. The lens only decides how much of that perspective you include.
This is the heart of the one‑lens month: you learn to internalise the relationship between angle‑of‑view and distance, so you can look at a scene and know instinctively:
where to stand
what the camera will see
how the frame will behave
and how the perspective will feel
Before the camera even comes to your eye.
A single focal length teaches this relationship with clarity. You begin to recognise how far you need to be for the frame to feel right. You learn the distances that suit your lens, the gestures that work at that angle, and the perspective that feels natural to your way of seeing.
Over time, this becomes a quiet fluency — a sense that the lens and your movement are speaking the same language.
Choosing a Focal Length — How Each One Shapes Attention
There is no single “correct” lens. Each focal length asks you to see differently. Below I describe how four classic choices tend to shape attention and behaviour on the street. Choose the one that will nudge you out of habit, or the one that feels like a useful constraint for the work you want to deepen.
24mm A Twenty‑four millimetre lens is immersive and generous with context. It invites you to get very close, to include foreground detail that anchors a scene, and to embrace perspective distortion as a compositional tool. With 24mm you can make the environment speak as loudly as the subject; the frame becomes a stage where foreground and background converse. This focal length rewards boldness and a willingness to be physically present in the moment. It is excellent for crowded streets, markets, and scenes where the relationship between people and place matters as much as gesture. Expect to move your body into the scene; expect to negotiate proximity with care.
28mm Twenty‑eight millimetres sits between the dramatic wide and the conversational standard. It is energetic and immediate without being extreme. With 28mm you can capture layered scenes and spontaneous interactions while still keeping a sense of intimacy. It encourages you to stand close enough to feel the rhythm of a street but far enough to include context that gives the gesture meaning. Many photographers who favour a lively, documentary energy find this focal length a generous companion: it keeps you engaged with the crowd while allowing small gestures to breathe.
35mm Thirty‑five millimetres is the classic street focal length for a reason. It balances subject and environment with a natural, human perspective. It asks you to be conversational — close enough to feel the subject’s presence, wide enough to include the city’s texture. With 35mm you learn to read mid‑distance interactions, to layer elements in the frame, and to trust the camera as a quiet witness. If you want a lens that teaches you rhythm, cadence, and the art of seeing relationships, 35mm is a patient teacher. It is forgiving, versatile, and often the best place to begin a one‑lens month.
50mm Fifty millimetres offers a more selective, intimate view. It compresses space slightly and asks you to be more deliberate about distance and timing. With 50mm you often stand a little farther back; the frame becomes about gesture and expression rather than environment. This focal length suits quieter work, portraits in the flow of the street, and images that rely on compression and selective context. It is a lens that rewards restraint and a careful negotiation of proximity. If your practice is moving toward intimacy and expression, 50mm will teach you to wait and to choose.
85mm An eighty‑five millimetre lens introduces a different kind of attention entirely. It compresses space more noticeably than 50mm and asks you to work with a quieter, more deliberate rhythm. With 85mm you often stand farther back, letting gesture, posture, and expression carry the frame while the environment softens into suggestion. This focal length rewards patience: you wait for alignment, for a turn of the head, for a moment when the subject’s presence feels unmistakably theirs. It is a lens well suited to intimate street portraits, quiet observational work, and scenes where emotional clarity matters more than context. If you already feel fluent with 35mm or 50mm, an 85mm month will teach you restraint, timing, and the art of letting the subject come to you.
Note: the focal lengths above describe the field of view on a full‑frame sensor; readers using APS‑C, Micro Four Thirds, phones, or medium format should convert to their camera’s effective focal length.
A Note on Attention Over Gear
Whichever focal length you choose will shape your month — but the month itself is not about gear. It is about attention. The lens is simply the constraint that teaches you to see more deliberately. The angle of view and the distances you choose become a language, and the month is your immersion in it.
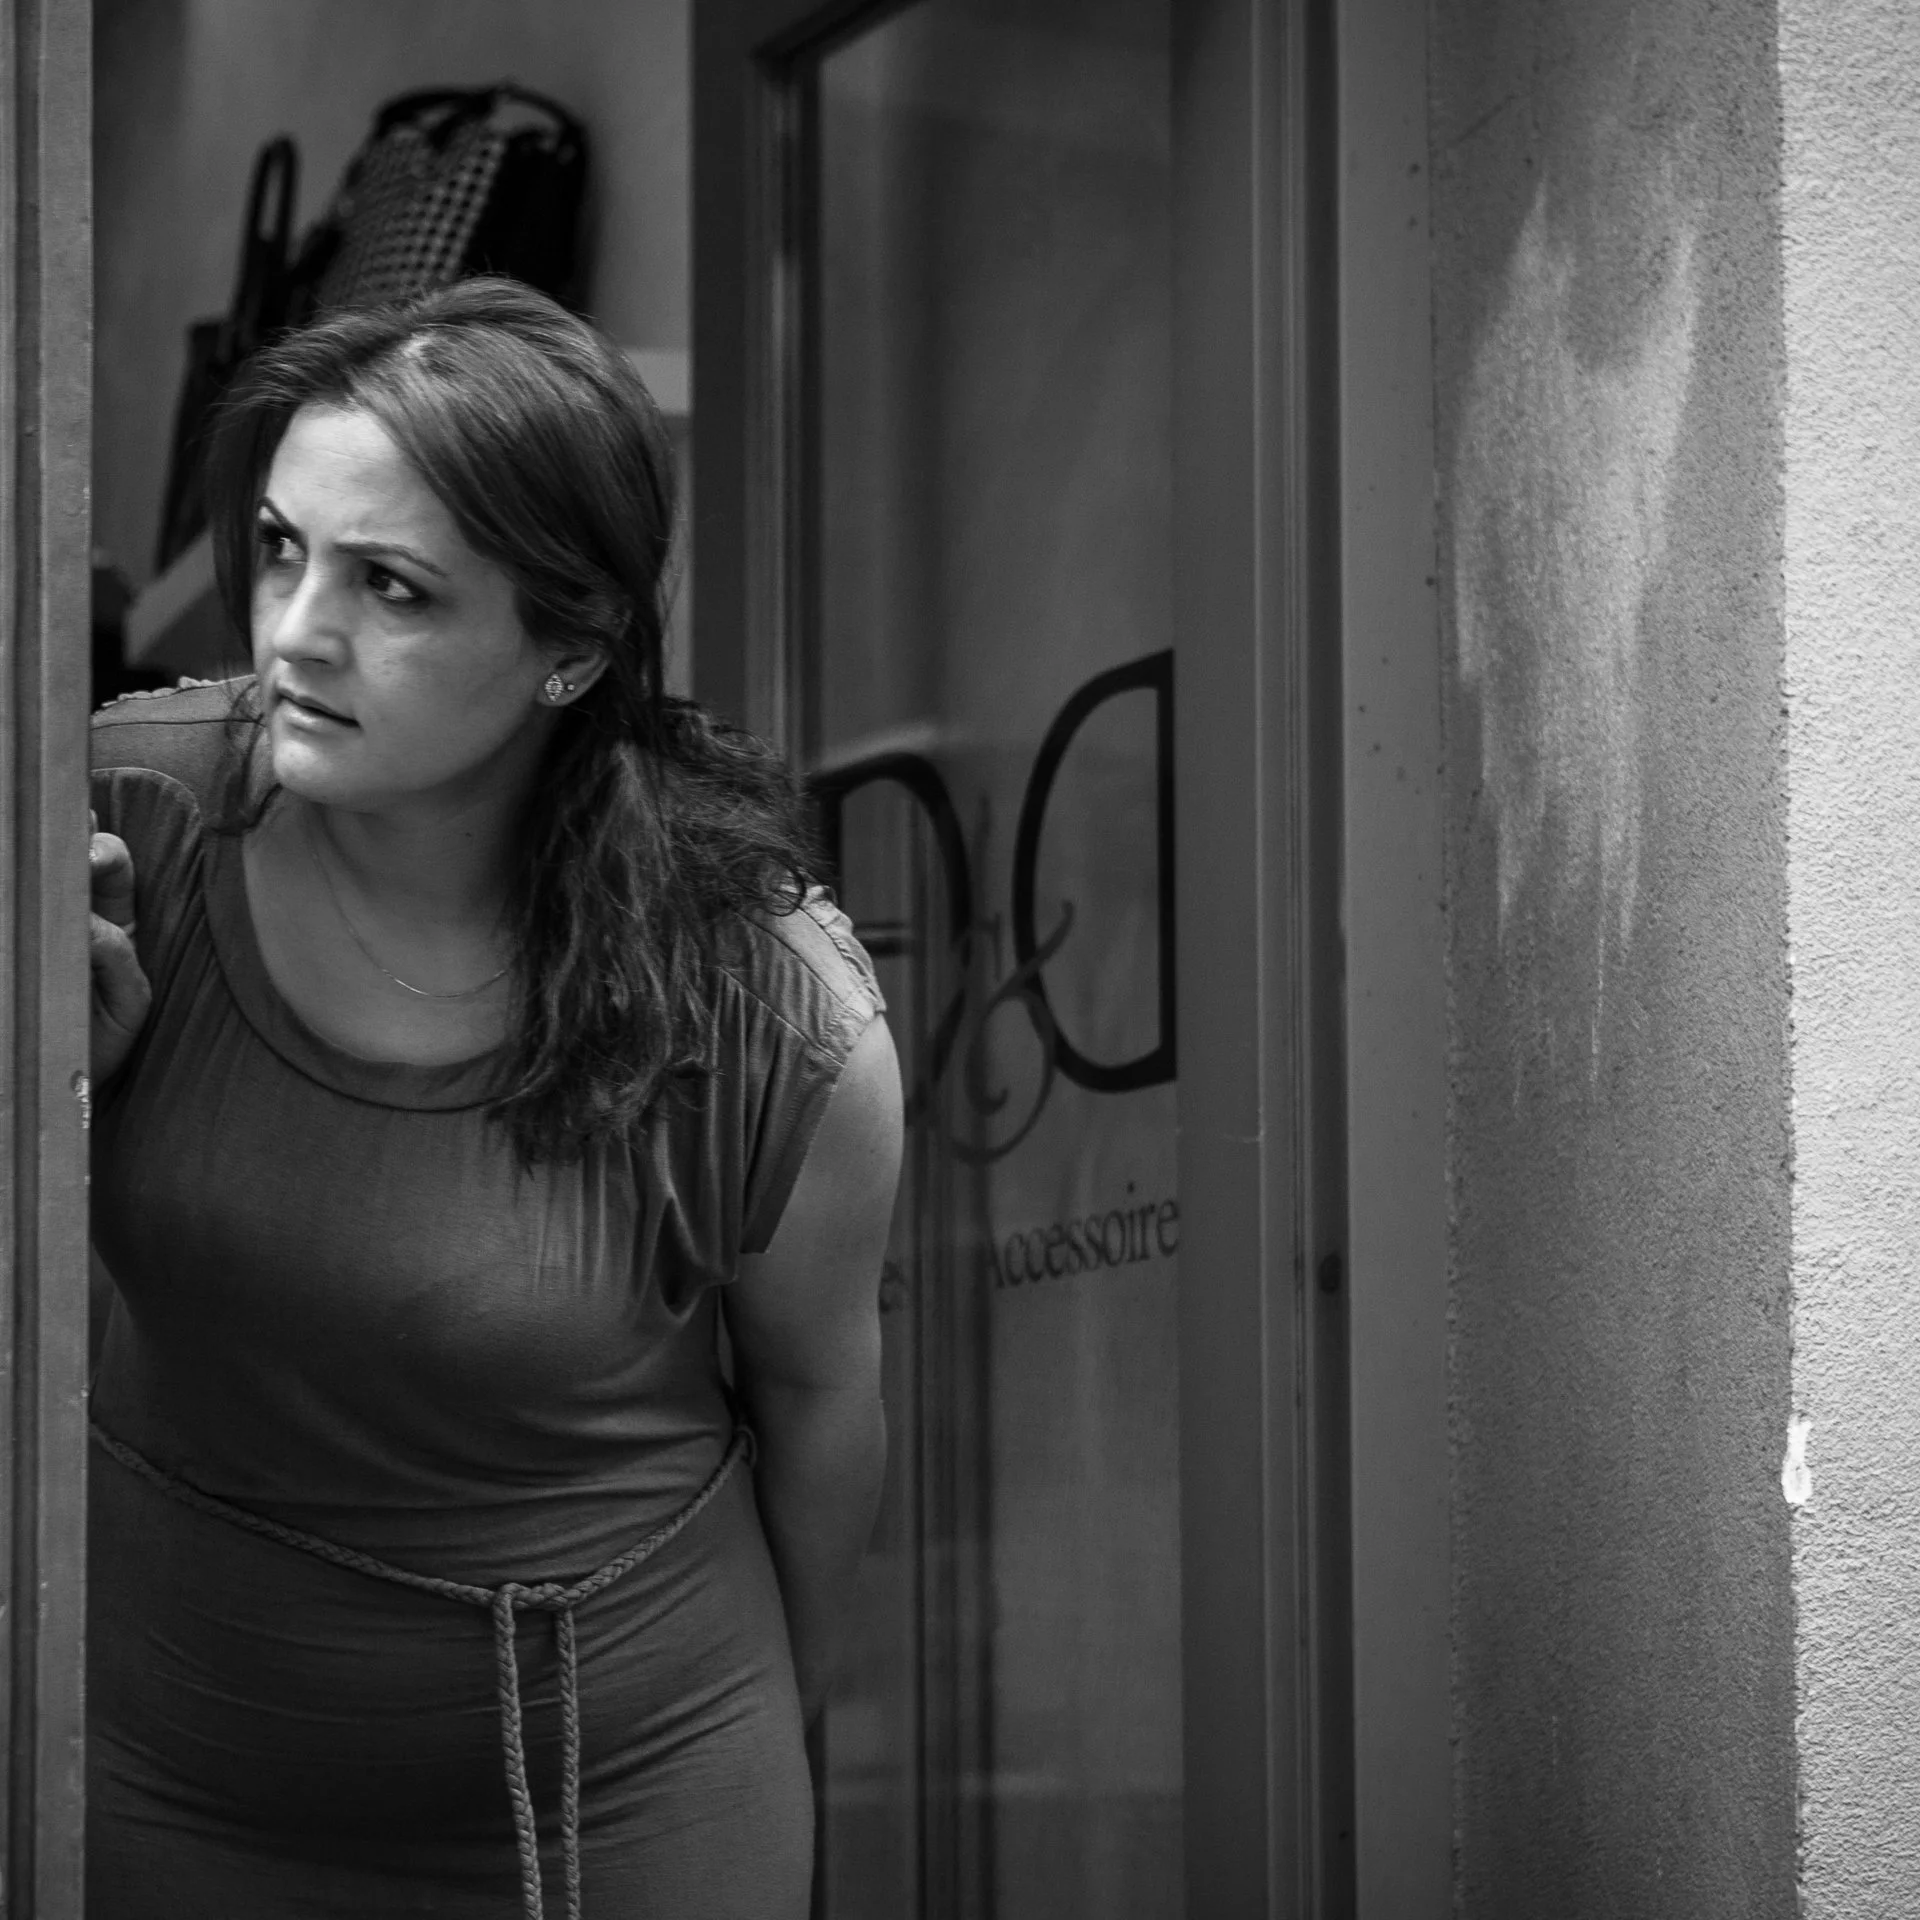
A Moment at Via Cappello
© 2026 Jean-François Cléroux | Via Cappello, Verona, Italy
This photograph, made in the courtyard entrance to Casa di Giulietta in Verona, carries a quiet theatrical tension. The subject’s partial emergence from the doorway — leaning forward, caught mid‑gesture, and looking intently to the left — creates an immediate sense of narrative. We feel her attention pulled toward something just outside the frame, and that absence becomes the emotional engine of the image. The black‑and‑white treatment strengthens this effect: it strips away distraction, letting the viewer focus on posture, contrast, and the interplay between figure and architecture.
The framing is one of the image’s strongest elements. The doorway acts as a natural proscenium, holding the subject in a defined space while the textured wall on the right provides a tactile counterweight. The signage behind her, partially legible, adds a subtle graphic layer that hints at place without overwhelming the moment. There is a pleasing tension in how the subject is cropped — neither fully inside nor fully outside — which mirrors the emotional ambiguity of her gesture. A slight adjustment in exposure or local contrast could deepen the separation between figure and background, but the overall tonal balance is already working well.
What lingers is the mood: a pause, a hesitation, a moment of listening. The photograph feels both candid and intentional, as though you caught a private gesture in a storied location where countless visitors enact their own small dramas. It’s a quiet image, but one that rewards attention — the kind of frame that invites the viewer to imagine what lies just beyond its edges.
Autofocus and Zone Focus in Street Practice
There are two practical approaches to focus I ask you to explore during your one‑lens month: autofocus and zone focus. Each has its place; each teaches something different about attention.
Autofocus — the modern convenience
Autofocus is fast and forgiving. It helps when subjects move unpredictably or when you’re working at varying distances. But autofocus is not a substitute for seeing; it is a tool that should serve your attention, not replace it.
Practically, this means learning a few camera‑specific habits: choose sensible AF modes (single‑shot for deliberate frames, continuous for motion), practise selecting AF points quickly, and consider back‑button focus so focusing and shutter release become distinct actions.
A note of caution: not all cameras and not all lenses are equal in autofocus performance. Some bodies lock quickly even in low light; others hunt. Some lenses — especially modern native primes — pair beautifully with their bodies; older or third‑party lenses may be slower or less consistent. If your system allows interchangeable lenses, test your pairings before the month begins. Learn which combinations you can trust when a gesture arrives unexpectedly.
Zone focus — the older, quieter discipline
Zone focus asks you to pre‑set a distance and an aperture to create a depth‑of‑field “zone” — a band of distances that will be acceptably sharp. It is ideal when shooting blind because it removes the need to hunt for focus and keeps you present in the moment. It teaches you to estimate distance, to move with intention, and to trust your feet.
Zone focus will sharpen your ability to anticipate and to crop live; autofocus will teach you to react cleanly to sudden, unpredictable gestures. Practise both. Notice what each teaches you about timing, distance, and presence.
A clear warning: remember to change your zone. If the scene shifts in depth — if you step closer, shoot across the street, or the moment unfolds differently than expected — your preset zone may no longer include the subject. Practise estimating distances quickly; use a smaller aperture and a bit more relaxed framing — either by stepping back or, from the same distance, a slightly wider focal length — in order to widen the forgiving zone when needed. Learn to read the street in metres — a quick mental habit of “one, two, three metres” will save more frames than you expect.
Practical tricks help: note the focus markings on your lens, use a small piece of tape to mark a commonly used distance, or practise setting the focus ring by feel so you can change zones without looking. The discipline of checking and resetting your focus setting is part of the practice; it keeps you honest and present.
Primes, Zooms, and a Practical Recommendation
For this month‑long experiment I strongly recommend fixed focal length lenses (often called “prime lenses”). A fixed focal length asks you to move your body, to learn exact working distances, and to develop muscle memory for framing. Optically, primes are often sharper, lighter, and faster — qualities that matter when you want the camera to feel like an extension of your eye. More importantly, a prime reduces choice in a way that clarifies attention: you stop asking the lens to solve compositional problems and start asking your feet and your timing to do the work.
If a prime is not available and you must use a zoom, treat the zoom as if it were a prime for the month. Choose a focal length and lock it there mentally — and physically if you can. Resist the temptation to zoom in and out while shooting. If your zoom has a clear detent at a useful focal length (for example, 28mm or 35mm), use it and leave it. If not, mark the ring with a small piece of removable tape so you can find your chosen focal length by feel. The point is to create the same constraint a prime provides: one field of view, one set of distances to learn.
If you must rely on a zoom because of travel, a single‑lens kit, or budget, use the month to notice how your movement changes when you zoom versus when you move your feet. That awareness alone will sharpen your seeing. You will begin to understand how framing with the body differs from framing with the glass — and that understanding is one of the quiet rewards of the one‑lens month.
Practical Plan for a One‑Lens Month
Treat the month as a laboratory. Here is a simple, practical structure you can follow.
Week 1 — Learn the Field of View Walk slowly. Make no more than a few frames per block. Notice how much you need to move to include or exclude elements. Practice “cropping live” by imagining the frame before you raise the camera.
Week 2 — Alternate Focus Methods Spend three days using autofocus, three days using zone focus, and one day mixing both. Keep notes on what each method teaches you about timing and distance.
Week 3 — Sequence and Rhythm Make short sequences of three to five images that explore a single gesture or place. Print contact sheets or export a grid to see how images relate when placed together.
By week three, many photographers describe a quiet sense of companionship with the lens — a feeling that the angle of view has become familiar, almost conversational.
Week 4 — Reflect and Refine Review your month as a whole. Look for recurring gestures, distances, and light. Ask which images feel like you and which feel borrowed. Let the evidence of the month inform your next choices.
If you expect to crop, shoot with sufficient resolution and consider RAW to preserve detail and latitude in editing.
Throughout the month, keep a small notebook. Write one sentence after each outing: what surprised you, what felt familiar, what you learned about distance and timing. These sentences will become the quiet map of your progress.
A Practical Cheat‑Sheet (Keep This in Your Pocket)
Daily log: Date — Lens — Focus method — One surprise — One thing to try tomorrow.
Zone focus quick settings
Zone focus depends on light, distance, and the depth‑of‑field you need.
Aperture: Start with f/8 for a wide, forgiving zone. Use f/5.6 when light is low or when you want a slightly narrower, more selective zone. In dim conditions, you may need to raise your ISO — sometimes to 1600, 3200, or higher — to keep your shutter speed fast enough for street work. Grain is not the enemy; missed focus is.
Distances: Practise three common working distances: 1.5 m (5 ft), 2.5 m (8 ft), 4 m (13 ft). For readers who work in imperial units, these approximations will feel natural in practice. These cover most street interactions. Learn to pace them out with your feet until they become instinctive.
Lens markings: Mark a frequently used distance on the lens with a small piece of tape. This gives you a tactile reference when shooting blind or adjusting focus without looking.
Zone focus is a discipline of estimation and presence. The more you practise, the more your body learns the distances your eye already knows.
Autofocus tips
Autofocus is fast and forgiving, but only when used deliberately.
Single‑point AF for deliberate frames.
Continuous AF for motion and unpredictable subjects.
Back‑button focus to separate focusing from shutter release.
Test lens/body pairings in advance — some combinations lock instantly, others hunt. Know which you can trust before the moment arrives.
Autofocus is a tool, not a crutch. It should serve your attention, not replace it.
If you only have a zoom
Treat the zoom as if it were a prime.
Choose one focal length and commit to it.
Mark the ring with tape if needed.
Move your feet — let your body do the framing, not the glass.
The constraint is what teaches you, not the lens.
Ethics and Safety
Ask: does this image respect the dignity of the subject? If in doubt, step back, wait, or choose not to publish.
Editing is an ethical act — the images you keep shape how people are seen. Constraint is never an excuse to ignore dignity; if anything, it sharpens your responsibility to move with care.
Keep situational awareness: watch your surroundings, secure your gear, and prioritise safety for yourself and your subjects.
Closing Invitation — Technique, Equipment, and Attention
Technique and equipment are in service of attention. The one‑lens month is a practical way to make that sentence true. It gives you concrete, usable steps: test your gear before you begin; practise both autofocus and zone focus so you understand their strengths and limits; favour primes when you can because they teach movement and distance; and if you only have a zoom, make it behave like a prime so the constraint still does its work.
A one‑lens month is not about proving discipline. It is about learning fluency — the quiet, embodied knowledge of how a single field of view shapes your relationship with the street. When the month ends, you will carry that fluency into every lens you pick up. You will move differently, anticipate differently, and see with a steadier, more intentional eye. The camera begins to recede; your attention becomes the thing that makes the picture.
Over thirty days you will learn the grammar of a field of view. You will discover the distances you favour, the gestures that call to you, and the small, recurring rhythms that define your way of seeing. That fluency will follow you into every future choice — lens, project, place, or moment.
This exercise is a way of returning to the fundamentals: attention, presence, and the slow craft of noticing. Choose a lens, step outside, and let the constraint teach you how to see. Keep the work slow enough to hear what it says; let your attention be the measure of every technical choice you make.
Coming Up in The Flâneur’s Journal
Next week, we return to The Architecture of a Photographic Project series with Chapter 5: Stepping Into the Middle of the Work — a deeper exploration of the moment when a project stops feeling like scattered signals and begins to gather its own gravity. If this week’s Sutras invited you to consider presence as a way of moving through the world, next week’s chapter turns that presence toward long‑form practice: how intention begins to take shape, how curiosity becomes commitment, and how the work quietly asks more of you.
Chapter 5 looks closely at the middle distance of a project — the emotional centre that starts to clarify, the threads that begin to strengthen, and the subtle shift from noticing to devotion. It’s about recognising when the work is guiding you, and learning to stay close without forcing direction.
The following week brings a standalone reflection: The Yoga Sutras for Photographers. This piece turns toward the quieter disciplines that sustain a creative life — breath, ethical attention, patience, and the slow accumulation of presence that shapes both the photographer and the work. If Chapter 5 explores the architecture of commitment, this Sutras essay explores the inner posture that makes such commitment possible.
More is unfolding. Return next week as we continue walking this series forward, one attentive step at a time.