The Quiet Language of Silhouettes
Finding mood and meaning in light’s absence.
Reduced to a dark outline against light, a subject sheds its particulars until only shape, posture, and context remain—each contour a quiet sentence, each pause of negative space an invitation. Anonymity here is not erasure but translation: faces fall away so gestures speak louder, and the image becomes a small myth the viewer completes from memory and feeling.
This post unfolds practical ways to expose for highlights, preserve clean silhouette shapes, and compose with negative space, then closes with two short exercises to sharpen your eye and deepen your sense of visual economy.
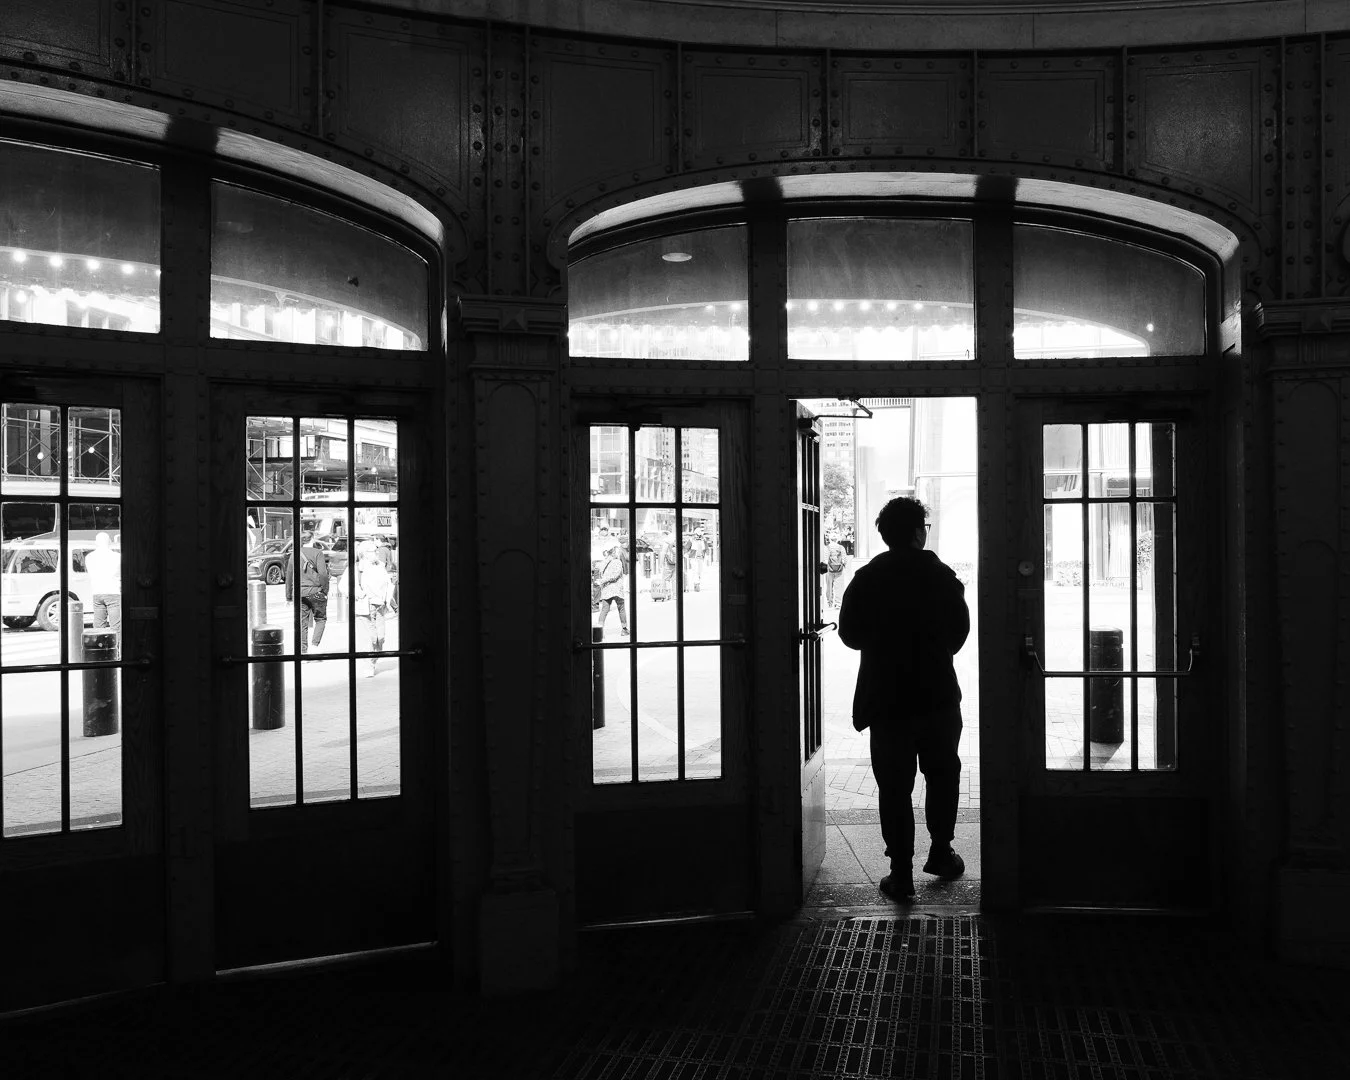
Portal of Light
© Jean-Francois Cleroux | NYC, NY, USA
A high‑contrast black‑and‑white photograph frames a lone figure in silhouette as they pass through riveted glass double doors set within ornate metalwork; the bright, bustling street beyond—pedestrians and traffic reduced to luminous suggestion—forms a dramatic threshold between interior shadow and urban light, emphasizing movement, transition, and the graphic interplay of frame and negative space. An odd‑numbered grouping of elements (Rule of Odds), used with the rule of thirds, lends the composition a deliberate balance, yet the image reads slightly off‑kilter: the dark weight of the right edge, the subject’s placement, and their gaze to the right draw the viewer’s attention away from the glass panels and the street activity on the left creating slight tension.
Why silhouettes work
Simplicity amplifies meaning. When a subject is reduced to a dark outline against light, every extraneous detail falls away and what remains is pure shape: the curve of a shoulder, the angle of a hand, the geometry of a hat. That reduction forces the eye to read composition, gesture, and contrast as the story itself, so emotional cues become immediate and almost archetypal; a single silhouette can register as loneliness, defiance, tenderness, or motion without a single facial expression. Because the visual vocabulary is pared down, viewers supply context from their own memories and associations, and the image gains a clarity and potency that cluttered, detail-rich photographs rarely achieve.
Anonymity creates universality. By hiding identity, silhouettes remove the particulars that tether an image to a single person or moment and instead let posture and relationship carry the narrative weight. A head bowed, a pair of figures walking apart, a child mid-leap—these shapes read as human truths rather than biographical facts, so the photograph becomes a vessel for shared feeling rather than a portrait of one life. That anonymity invites projection: viewers step into the scene and complete the story, which makes the photograph more resonant across cultures and experiences.
Finding and Exposing for highlights
Silhouettes are not bound to a single hour or source: shoot toward the sun to backlight your subject, place figures within sunlit pathways, tunnels, or arches so the bright backdrop becomes the light source, and in the evening even the soft, dusky glow will render compelling outlines. Street lights, building lights, illuminated signs, and other pockets of artificial light can be just as effective — small beacons that carve shape from darkness and give the city its own quiet stage.
Meter the background, not the subject. Use spot or center-weighted metering aimed at the brightest part of the sky or background so the camera exposes for highlights and underexposes the subject into a clean silhouette.
Lock exposure or use exposure compensation. On auto modes, lock exposure on the bright area or dial in negative exposure compensation until the subject becomes a solid dark shape. In street photography, using a camera that has an exposure compensation dial or a camera that can have a dial re-mapped or set to act as an exposure dial is the easiest, but any camera will work.
Keep ISO low and aperture moderate. ISO 100–200 preserves color in the sky or background; choose an aperture that gives the depth of field you want while keeping shutter speed fast enough to avoid blur.
Avoid fill flash. Flash defeats the silhouette by lighting the subject; only use flash if you want a rim-lit or partially revealed effect.
Note for analog film photographers: leave room for the darkroom. Film offers a different kind of latitude, and it’s wise to expose with printing in mind. Make exposure decisions that preserve the option—at printing time—to either reveal a hint of shadow detail or suppress it entirely. The same considerations apply to background mid‑tones and highlights: a slightly denser negative can give you more control when burning, dodging, or shaping local contrast under the enlarger. Don’t ignore the expressive possibilities available in the darkroom; a thoughtful exposure now becomes a palette of choices later, allowing you to refine the silhouette’s clarity, mood, and tonal balance in ways digital workflows often handle differently.
Crystalline Threshold (image example below) is a good reminder that silhouettes don’t require direct or even indirect sunlight. This photograph was made on a dark, overcast day—no golden hour, no dramatically bright sky—yet the difference in luminance between the figures and the glass pyramid, paired with thoughtful exposure, created a clean, legible silhouette. Situations like this appear in almost any light: soft cloud cover, reflected light off buildings, the pale glow of an open plaza. What matters is the relationship between subject and backdrop, not the brightness of the day. Once you learn to read those differences, silhouettes stop being a weather‑dependent technique and become a way of seeing.
Preserving silhouette shape
A clean silhouette is the photograph’s grammar: when the edge is clear, posture and gesture read instantly; when it’s muddled, the sentence collapses and the image loses meaning. In street work you cannot direct people, so preserving that outline becomes an exercise in anticipation, movement, and restraint rather than instruction.
A silhouette succeeds not only because the figure is strong, but because the background allows that strength to be seen. The most demanding part of silhouette work is often not the subject at all, but the photographer’s ability to read edges, corners, and the negative spaces that hold the outline in place. A plain stance against a busy backdrop will fall flat, while a figure with distinctive contours—a hat, a coat with movement, a bit of plumage or flourish—can turn into a small piece of theatre when paired with the right light. The subject matter follows the same logic as photographing people in general: some individuals carry visual presence the way performers do, and that presence needs a background that honours your voice. A great silhouette is always a pairing—an expressive shape matched with a backdrop that lets it breathe.
Favor recognizable profiles—hats, bicycles, umbrellas, strong head‑and‑shoulder contours—because they give the viewer immediate anchors. Isolate the subject by changing your position: move left or right, lower your viewpoint, or shift forward and back until the figure sits against a bright, uncluttered patch of sky or light. Use depth of field and distance to separate overlapping elements; stepping a few paces can turn a merged mass into distinct limbs and readable posture. When movement is the only option, wait for the right moment—watch for gestures that create small negative gaps (an arm away from the torso, a leg stepped forward) and be ready to press the shutter.
Practical habits that protect silhouette legibility:
Scan for clean backdrops as you walk; frame so the subject’s edge meets bright, simple tones.
Move, don’t touch—reposition yourself to create separation rather than attempting to influence the subject.
Anticipate and time—learn common gestures and positions in your location so you can capture the instant a shape becomes unmistakable.
Treat the silhouette as an intentional subject: every step you take, every angle you choose, is part of composing the outline. That discipline turns fleeting street moments into images that read clearly and resonate universally.
Composition and negative space
Composition is the conversation between subject and silence: how forms sit, breathe, and relate within the frame. Negative space is not absence but an active field that gives shape meaning—its size, tone, and texture determine whether a figure reads as solitary, monumental, or intimate. Thoughtful composition treats emptiness as a partner to the subject, using scale, placement, and contrast to shape mood and guide the viewer’s imagination.
Large areas of empty sky or shadow can amplify feeling: a small figure dwarfed by open space reads as lonely or contemplative, while generous darkness can suggest scale, stillness, or quiet authority. Conversely, tight framing with little negative space compresses the scene and intensifies presence; proximity makes gestures urgent and the moment immediate. Use the amount and quality of emptiness deliberately—soft, luminous negative space will soothe; hard, graphic voids will dramatize.
Placing a silhouette to one side invites motion—the empty space ahead becomes a promise—while a centered figure can feel suspended, its direction undecided and its stillness charged with tension.
Use architecture, shadows, and natural lines as compositional tools that lead toward the silhouette and reinforce its role as focal point. Leading lines—streets, railings, beams of light—draw the eye into the frame and toward the outline, while doorways, arches, and window frames act as literal picture frames that isolate and elevate the subject. Think of these elements as directional punctuation: they focus attention, clarify scale, and turn empty space into purposeful structure.
Post processing tips
Post‑processing is where intention meets craft: it lets you clarify the silhouette’s grammar, deepen the mood of the background, and ensure the image reads exactly as you saw it. Thoughtful edits should strengthen the outline without revealing unwanted detail, enhance the tonal drama of the sky or light source, and use selective adjustments to preserve the photograph’s simplicity and emotional weight.
Crush blacks selectively. Push shadow tones toward pure black to reinforce the silhouette’s edge, but do so with restraint so the background retains its subtlety. Targeted contrast in the dark areas will make the outline read crisply against the sky while avoiding a flat, posterized look elsewhere.
Boost background color and clarity. Enhance the sky’s vibrance and midtone contrast to make the silhouette pop without illuminating the subject. A modest increase in clarity or local contrast in the backdrop can separate the figure from the scene and restore the sense of depth that a silhouette relies on.
Use local masks for fine control. Paint or mask only the problem areas—bright patches on the subject, stray highlights, or noisy shadow regions—so you preserve a clean outline without compromising the rest of the frame. Layered masks let you darken specific highlights, recover subtle color in the sky, or add a gentle vignette that focuses attention on the silhouette.
Final polish. Inspect the image at 100% to ensure edges are clean, no stray midtones betray the silhouette, and over‑sharpening has not introduced haloing; then step back to judge the overall balance between shape and negative space. Small, deliberate edits and thoughtful crops deliver the greatest gains: deepen shadows to clarify the outline, enrich the background to lift the silhouette, and practice restraint everywhere else so the photograph reads as a single, quiet statement.
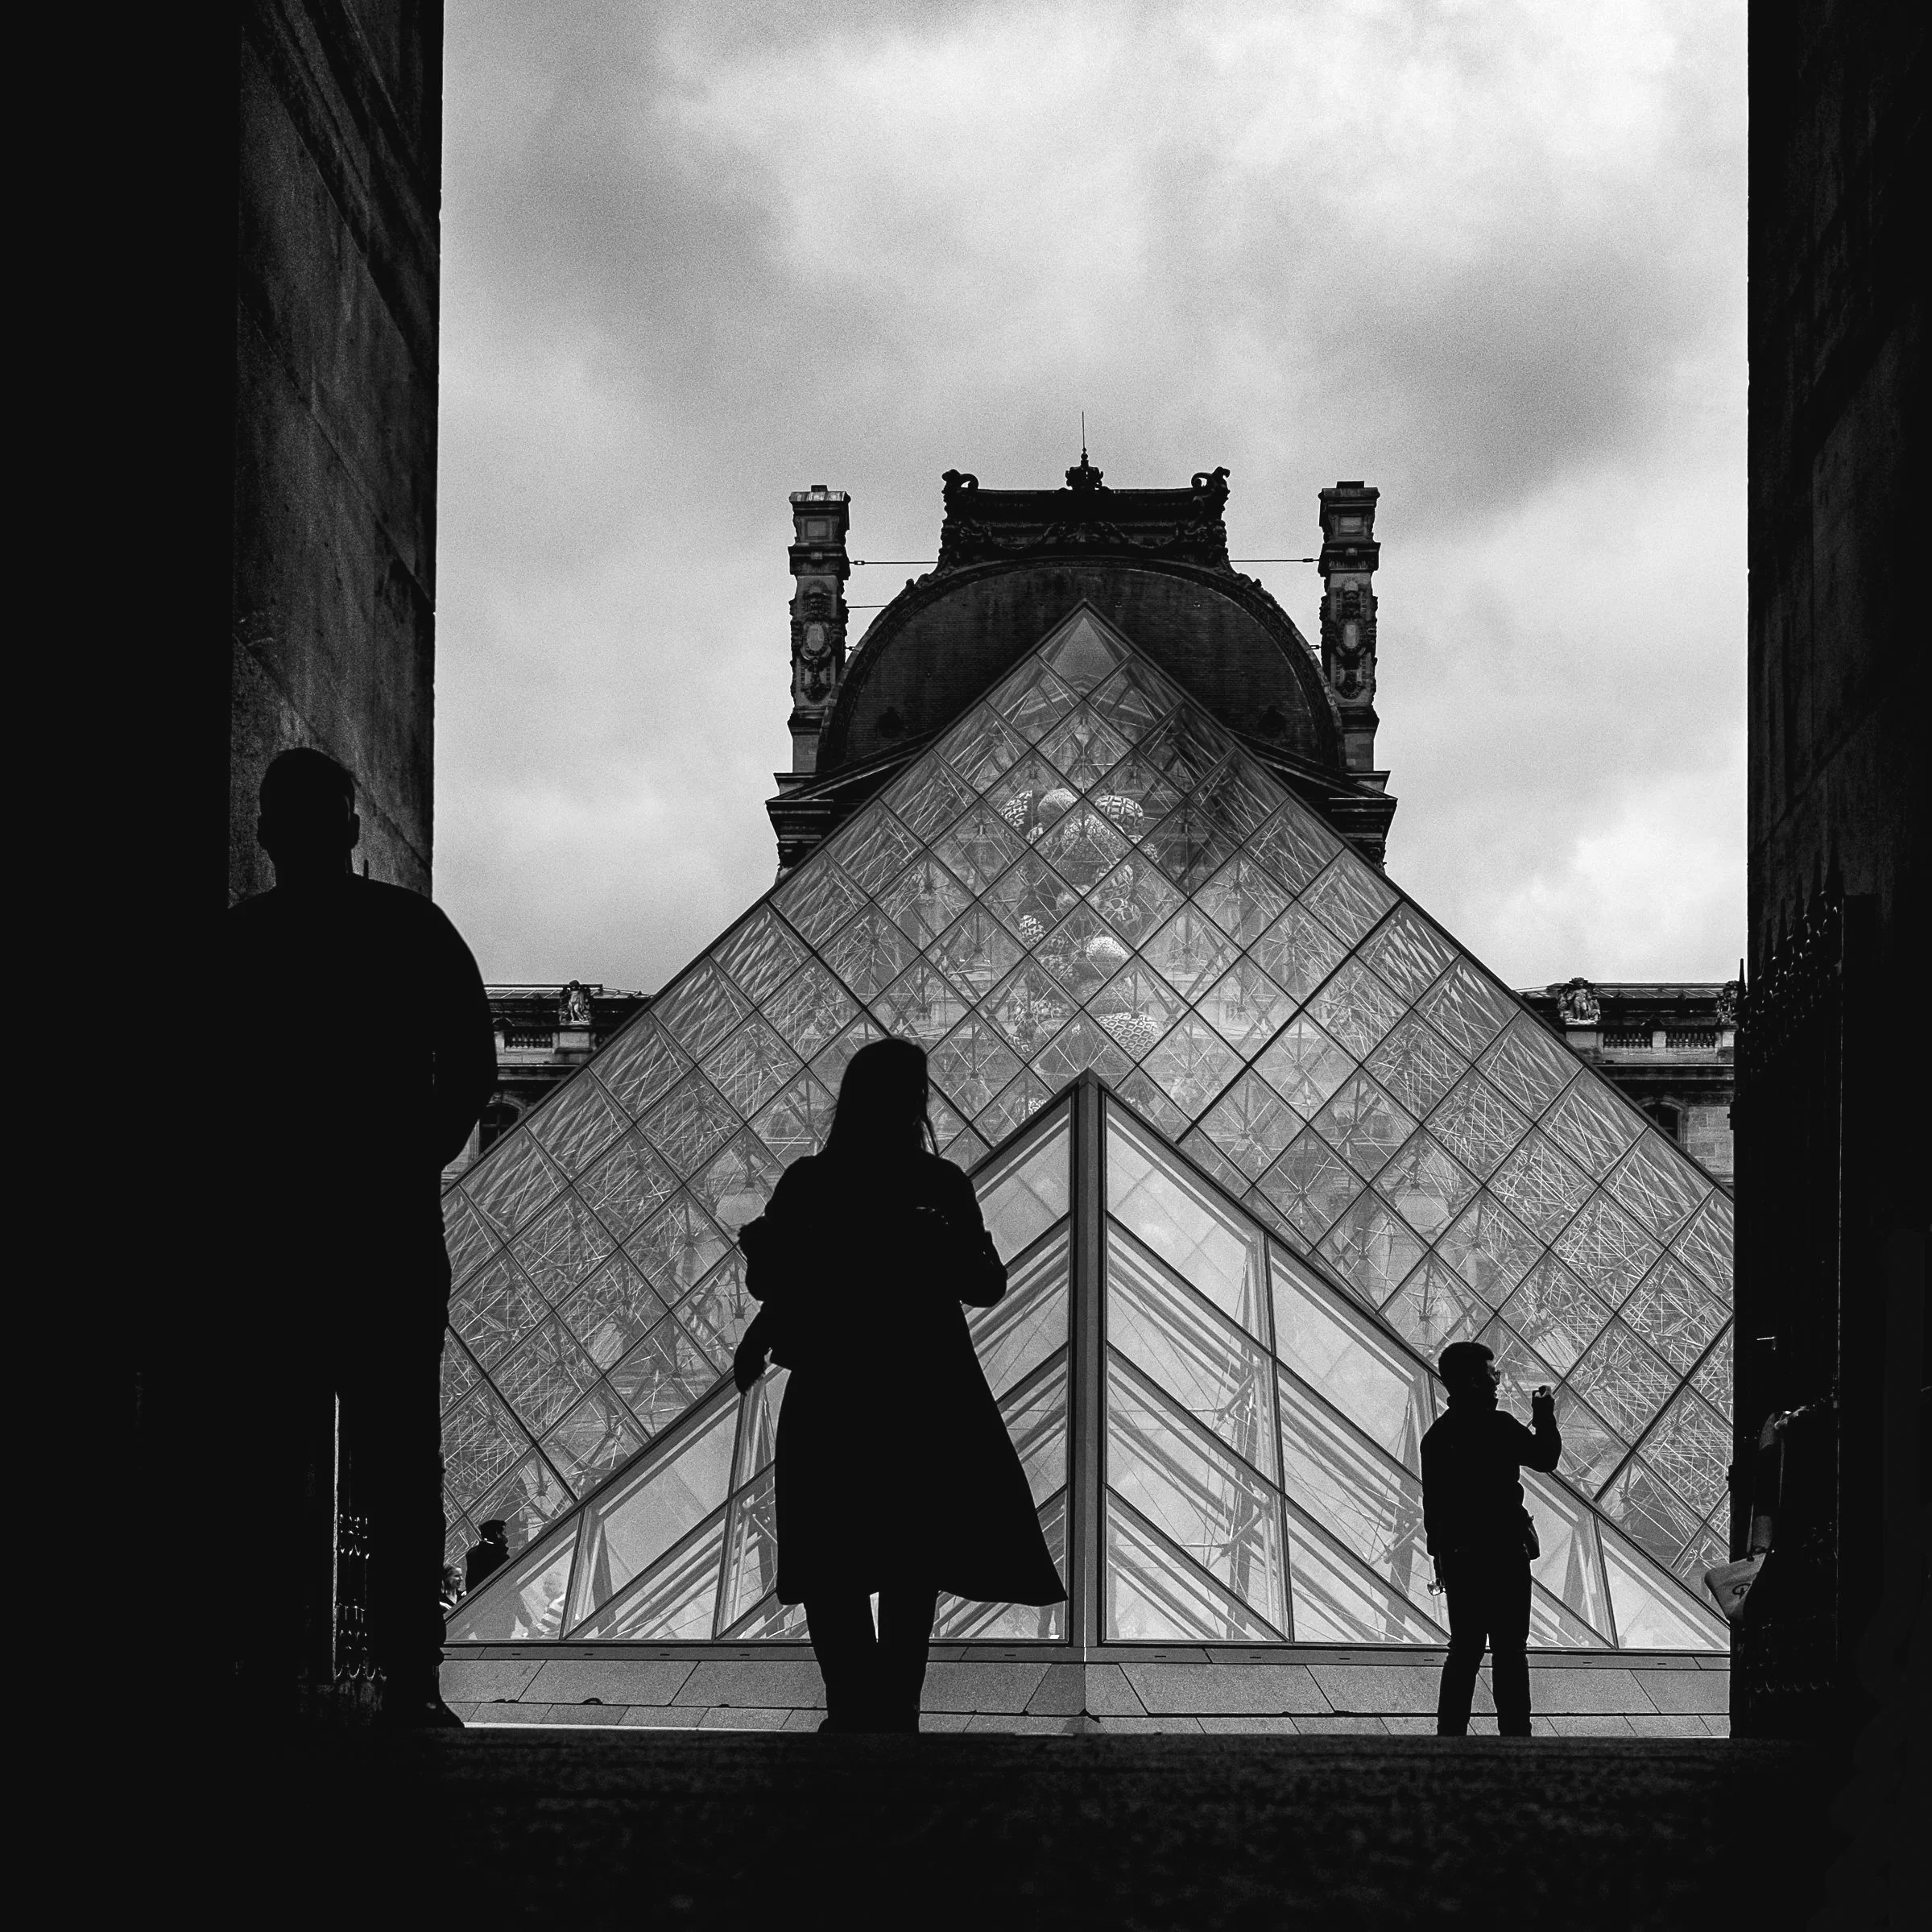
Crystalline Threshold
© Jean-Francois Cleroux | Paris, France
A glass pyramid breathes light into a grey Parisian sky, its geometric skin catching the city’s hush; three dark figures stand like punctuation against that crystalline plane—one poised, one central and still, one lifting a camera—each silhouette a small, private story set against the museum’s monumental calm. The scene reads as a study in thresholds: modern glass against classical stone, motion against stillness, and the quiet choreography of strangers whose outlines, reduced to pure shape, ask the viewer to supply names, gestures, and histories.
How lens compression defines scale and relationship: Lens compression—produced by using a longer focal length from a greater distance—flattens perceived depth and brings background and foreground visually closer, which in this frame does three useful things: it shrinks the apparent gap between the pyramid and the façades behind it, it narrows the spatial separation among the three figures so they read as a cohesive group rather than isolated points, and it magnifies relative size differences so the nearest silhouette feels more prominent without overwhelming the composition. In practice, compression makes the central and right figures appear more tightly related to the pyramid’s planes while the left figure, if slightly offset, becomes a counterpoint rather than a distant afterthought—the result is a compressed, almost cinematic layering where scale becomes a tool for emphasis rather than a literal measure of distance.
Exercises
Golden-hour silhouette study
Arrive early and claim a vantage where the low sun will sit behind architectural frames—piers, arches, bridges—then wait as the light narrows into a ribbon of gold; meter for the brightest band so figures fall to black, favour side profiles and small gestures that read at a distance, and use the changing colour and contrast to shape mood rather than rescue detail. Move a few paces left or right to test separation, switch focal lengths to alter scale and change compression, and watch for the instant when sky, frame, and subject align; adjust angle or exposure if the rim brightens, and between passes review frames quickly to note which outlines read as mythic and which collapse into ambiguity. Patience, timing, and restraint are the tools here—small shifts in position and a single decisive shutter press will often yield the most cinematic silhouettes.
Daytime architectural hunt
Walk slowly through arcades, underpasses, colonnades, and covered walkways looking for bright backdrops seen through shaded openings; mark doorways and tunnels where sunlight falls beyond a dark mouth, then test three vantage points—low to place sky behind the head, eye level to emphasize posture, and slightly elevated to isolate feet—and wait for a single figure to enter the frame rather than composing around crowds. Meter for the bright background, move to create clean separation (left, right, forward, back), and favour moments when limbs and negative gaps form readable gestures; let the built elements act as frames and leading lines that do the compositional work, and treat each location as a short study in timing and patience rather than a hunt for perfect subjects. Architecture will give you the backdrop; your movement and timing will make the silhouette.
Find a location with long, low light and spend 20 minutes photographing only silhouettes and cast shadows. Focus on isolating shapes, testing metering on the sky, and composing with negative space. Review shots immediately and note which outlines read best and why.
Takeaway
Let silence do the telling: reducing a scene to silhouette and shadow trades particulars for archetype, inviting viewers to complete the story with memory and feeling; careful composition, patient timing, and restrained post‑processing preserve that graphic clarity so a single outline can carry mood, scale, and narrative across cultures. Creating silhouettes is also a playful reset—an energizing way to revive a stalled day of shooting and see familiar streets anew.
Next Week in The Flaneurs Journal
The Evolving Photographer: Chapter 1 - A Six Part Series on Creative Growth and the Art of Seeing
Next week, we’ll step into Part II of this series — A Working Catalogue of Street Photography Styles — a chapter that widens the frame and offers new ways of thinking about how you approach the street. The series will unfold at a steady rhythm, every second week, giving you space to work through the exercises at your own pace and to notice how your seeing shifts over time.
Your practice will keep evolving as you move through each part. Stay with the process. Let the work gather meaning. Let your way of seeing grow a little more deliberate, a little more your own.